
The Complete Guide to Painting and Wall Treatments on a Budget
Every decision, every room, every mistake explained to bits, so you paint once and get it right.


⚡ QUICK ANSWER
Four steps, in order:
- Decide between paint, wallpaper, or wall panels for your situation
- Pick your paint finish and get your color testing done properly
- Paint in the right order: ceiling, then walls, then trim
- Know how to diagnose and fix problems when they show up
Have you ever bought a gallon of paint, gotten halfway through a wall, and thought:
“Wait, did I even need to prime this?”
I have. More than once, actually.
The first time I skipped it altogether on a dark-to-light change and spent an entire extra weekend fighting a third coat that still wasn’t quite covering.
This is a budget painting guide aimed to stop that mid-project doubt before it starts. It covers how to paint every surface in your home, how to pick between paint, wallpaper, and panels, how to choose a color you will not regret, and how to fix it when something goes wrong.
Ready? Let’s start with the decisions that actually matter before you open a can.
Before You Touch a Wall: The 3 Decisions That Actually Matter
Most painting content jumps straight to technique. But three decisions, made before you open a single can, determine whether the whole project goes smoothly. Skip these and technique will not save you.
Decision 1: Paint, Wallpaper, or Wall Panels?
So which one is actually right for you? It depends on your situation more than your taste, and almost nobody puts all three options on one honest table. Here it is.
| Method | Cost per m2 | Lifespan | Cost per Year | DIY Time | Reversible? |
|---|---|---|---|---|---|
| Paint | $3 to $8 | 3 to 5 years | $1 to $2 | 1 day | Yes, always |
| Traditional wallpaper | $8 to $20 | 10 to 15 years | $0.70 to $1.50 | 2 to 3 days | Difficult |
| Peel-and-stick wallpaper | $8 to $18 | 1 to 3 years | $4 to $8 | 4 to 6 hours | Only if wall is cured |
| Wall panels | $15 to $35 | 15 to 20+ years | $1 to $2 | 1 to 2 days | No, semi permanent |
According to Angi’s comparison of wallpaper and paint, wallpaper lasts around 15 years with minimal upkeep, while a painted wall typically needs a refresh every 3 to 5 years. That is a real gap. But durability is not the only thing that matters.
- Renting? Paint or panels carry the least deposit risk. Wallpaper only if it is genuinely peel and stick, and only on a wall that has fully cured.
- Like to change things up? Paint, no contest. Nothing else lets you repaint on a whim for $40.
- Wet room, like a bathroom? Wall panels or a real moisture rated paint. Marketing claims do not always survive actual steam.
- Want something low maintenance for the next 15 years? Wall panels win outright here. They cost more upfront but the cost-per-year math in the table above tells the real story once you stop thinking only about the first bill.
CAUTION: WAIT BEFORE YOU STICK ANYTHING TO FRESH PAINT
Give new paint at least 30 days to fully cure before applying wallpaper or peel and stick panels. Adhesive on paint that has not cured can pull the paint straight off later.
This matches the guidance from RenterFriendly’s testing guidance, which notes that most deposit-risk failures trace back to the wall underneath, not the product itself.
A friend of mine learned this one the hard way. She wallpapered her rental bedroom the week she moved in, before the landlord’s fresh paint had even cured. Eighteen months later, moving out, three strips came away with chunks of paint stuck to them. She lost part of her deposit over something a single month of patience would have prevented.
A quick note on panels specifically, since they get less attention than paint or wallpaper: they are the only option here that is genuinely semi-permanent. Once installed, removing them means patching the wall underneath, not just peeling something off.
That is exactly why they carry the lowest cost-per-year in the table above. You are trading flexibility for something that simply does not need touching again for well over a decade.

Decision 2: What Order to Paint In
Ceiling first, then walls, then trim. Every time. Why? Drips fall down, not up. Paint the ceiling last and you will be wiping specks off a wall you just finished. Paint the trim before the walls and you tape around it twice instead of once.
I learned this on my first real paint job, a spare bedroom I was rushing to finish. I did the walls first because they felt like the main event. Three hours later I was touching up ceiling drips with a tiny brush at 11pm. Never again.
Decision 3: Prep or Skip It?
Never skip it. According to Anderson Pro Painting’s assessment of paint failures, prep should account for 30 to 50 percent of a paint job’s total time. Skipping it is the single biggest cause of peeling, blotchy coverage, and early failure.
What real prep actually looks like:
- Clear the room or push furniture to the center, then cover it and the floor.
- Fill any holes or dents with spackle, let it dry fully, then sand smooth.
- Wipe every wall down with a damp cloth. Dust and grease stop paint from bonding properly, and you cannot see either one from across the room.
- Tape edges, trim, and outlet covers.
- Prime if you’re going from dark to light, covering a stain, or painting bare drywall for the first time. Skip it on a same-color repaint over a sound wall.
Here is the real math on why prep matters for your wallet, not just your walls:
| .. | Cost | Time |
|---|---|---|
| Proper prep and color testing | $30 to $60 | A few hours over one weekend |
| A full repaint because you skipped it | $300 to $900 | An entire redo, plus the first attempt |
That gap is the whole argument for slowing down at the start.
TIP: THE BEST TIME OF YEAR TO PAINT
Aim for mild, dry weather, 50 to 85 degrees Fahrenheit and low humidity, for both interior and exterior work. Paint dries too fast in direct summer sun and too slowly in cold, damp conditions, and both extremes cause visible problems later. Spring and early fall are usually the easiest windows.
A QUICK WORD ON SAFETY
Open a window and run a fan, even with low-VOC paint. Wear gloves if you have sensitive skin, and safety glasses when sanding old paint, especially in a home built before 1978 where lead paint is a real possibility. If you suspect lead paint, do not sand it dry. Get it tested first.
Choosing Your Paint Without Overthinking It
Standing in the paint aisle, staring at 40 shades of white? You are not alone. Here is how to cut through it fast.
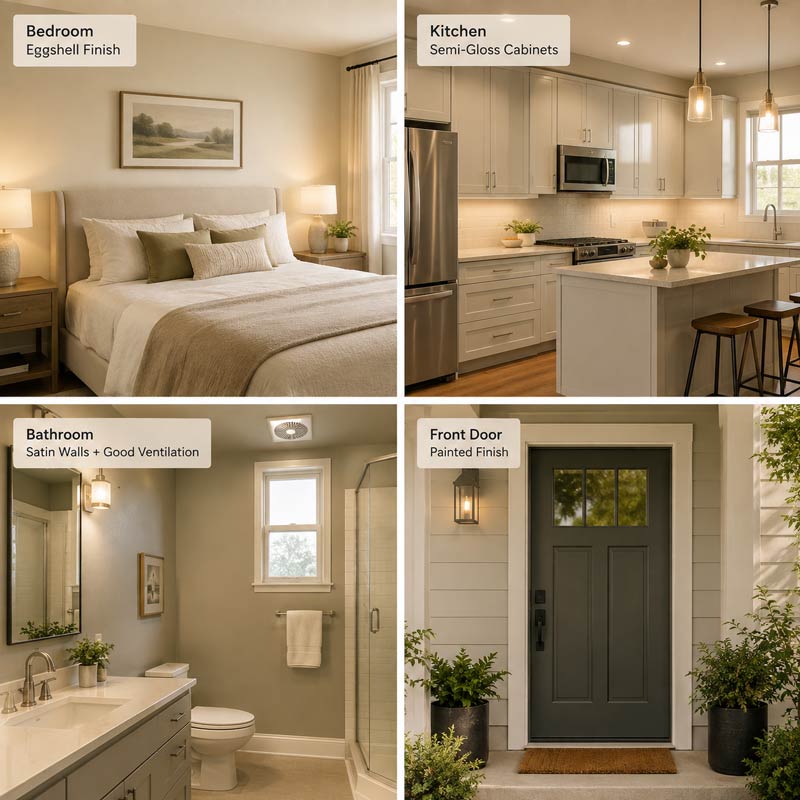
Paint Finishes Explained, by Room
Paint finishes explained simply: the finish controls how much light bounces off the wall, and how easy it is to wipe clean. More shine means more durability and more visible imperfections.
| Finish | Best For | Why |
|---|---|---|
| Matte / Flat | Ceilings, low traffic formal rooms | Hides imperfections, but marks easily |
| Eggshell | Bedrooms, living rooms | Soft look, reasonably washable |
| Satin | Hallways, kids rooms, dining rooms | More durable, wipes clean |
| Semi-gloss | Trim, doors, kitchens, bathrooms | Highly washable, handles moisture |
Budget vs. Premium Paint: When It’s Worth Spending More
- Worth it: high-traffic hallways, kids’ rooms, kitchens, anywhere you will be wiping the wall down often.
- Not worth it: a spare room, a closet, anywhere low traffic and rarely touched.
Premium paint often needs fewer coats too. If a cheaper can needs three coats to cover and a pricier one needs two, you are not always saving money by going cheap.
For the honest, tested comparison, see Best Budget Interior Paints: 8 Tested Head-to-Head, where eight budget interior paints were scored head to head, and Matt vs Eggshell vs Silk: Which Paint Finish for Which Room? for the full finish decision broken down room by room.
How Much Paint You Actually Need
Here is the simple math:.
One gallon covers roughly 350 to 400 square feet with one coat. Measure your wall height times the room’s total perimeter, subtract windows and doors, and divide by 375 for a safe estimate. Round up, and always buy a little extra for touch-ups.
A standard 12 by 12 foot room with 8 foot ceilings needs about one gallon per coat. Most rooms need two coats, so budget for two gallons on the walls alone.
Worked example: say your room is 12 by 14 feet with 8 foot ceilings. Perimeter is 52 feet, times 8 feet high equals 416 square feet of wall. Subtract roughly 40 square feet for a door and two windows, leaving 376 square feet. Divide by 375 and you need just over one gallon per coat, so two gallons total for two coats
TIP: When primer actually earns its cost
Use it on bare drywall, over a stain, or when going from a dark color to a light one. Skip it on a same-color repaint over a wall that is already in good shape. A tinted primer, mixed close to your new color, can even save you a full coat on a dramatic color change.

Room by Room: What’s Actually Different
A bedroom and a bathroom are not the same project. Here is the one thing that genuinely changes in each room, not generic advice repeated five times.
Living Rooms and Bedrooms
These are the lowest stakes room in the house – good natural light, low moisture, low traffic. If you are painting for the first time, start here. Mistakes made here are easy to fix and the room forgives an uneven hand.
- Finish: eggshell is the safe default. It hides small wall imperfections while still wiping clean if a kid or a dog leaves a mark.
- One thing to watch: north facing rooms get cooler and flatter light all day. Colors read darker and cooler than they do on the sample chip. If your room faces north, size up to a slightly warmer or lighter shade than you think you need.
Kitchens
Grease and steam are the enemy. You need a washable finish, satin or semi-gloss, not flat. Cabinets are their own decision entirely and do not need sanding if you use the right primer. See How to Paint Kitchen Cabinets Without Sanding: The Deglosser Method.
- Finish: semi-gloss on walls near the stove, satin everywhere else in the room.
- Cabinets in three steps: degrease thoroughly, apply a bonding primer made for glossy surfaces, then two thin topcoats. Skip the sanding, the bonding primer is what actually makes the paint stick.
Bathrooms
Moisture and mold are the real challenge here, not the color. Use a mold resistant finish and run the fan during painting and for a few hours after, while it cures. Check Best Bathroom Paint That Actually Prevents Mould (Tested in Real Bathrooms) – tested paints specifically for this, in real bathrooms, not lab conditions.
- Finish: satin or semi-gloss only. Flat and matte trap moisture in their texture and mold loves that.
- Timing: paint on a day with low humidity if you can. Steam from a shower can affect a coat that has not fully dried yet.
Exteriors, Brick, and Render
Weather exposure changes everything. Paint within the right temperature window, usually 50 to 85 degrees Fahrenheit, and never in direct sun on a hot day, since the paint dries too fast to level properly and can crack early.
- Bare brick indoors: needs a masonry sealer first or the paint absorbs unevenly and looks patchy no matter how many coats you add.
- Check the forecast: avoid painting exteriors if rain is expected within 24 hours of your final coat.
Trim, Doors, and Radiators
The fiddly stuff rewards patience over speed. Radiators specifically need heat resistant paint or they yellow within months. Front doors get the most daily wear of anything you will paint. How to Paint a Front Door: The Right Prep Makes All the Difference covers doing it properly, and it might be the single highest return project in this entire guide.
- Trim finish: always semi-gloss. It highlights the detail and takes years of scuffing before it needs a repaint.
- Radiators: let them cool completely first, and use paint labeled specifically for heat, standard wall paint will discolor within a season.
Color Without Regret
Have you ever painted a whole wall, stepped back, and thought, that is not what I pictured? According to a 2022 Sherwin-Williams survey reported by AceShowbiz, nearly 40 percent of homeowners regret their paint color within the first six months. That is a huge number for something so preventable.
The Cost-Sequenced Testing Method
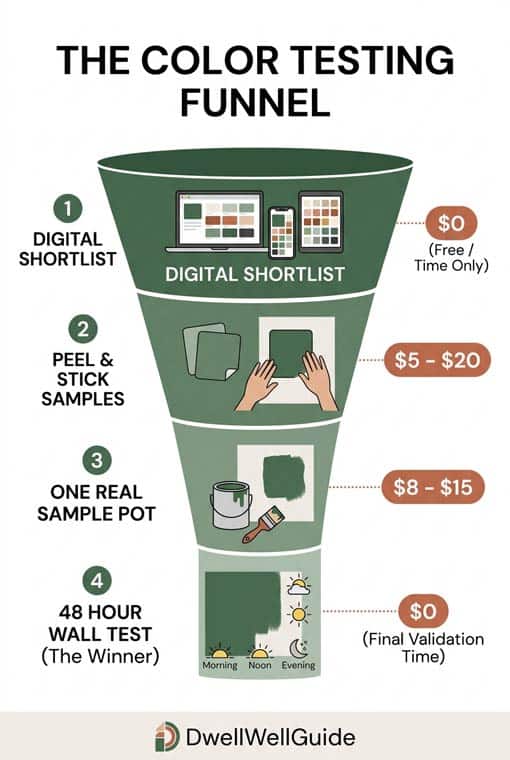
Test cheapest first, and only spend more once you have narrowed it down. Here is the order that wastes the least money:
- Shortlist digitally. Use your paint brand’s visualizer or just browse their color families online. Get it down to 3 or 4 candidates.
- Order peel-and-stick samples for your finalists. A few dollars each, and far more accurate than a tiny store chip.
- Buy one real sample pot of your top pick and paint a large patch, at least two feet square, directly on the actual wall.
- Watch it for 48 hours. Check it in the morning, at midday, and in the evening. Most regret happens because someone only looked at one time of day.
Why does the paper chip lie to you?
Store swatches are printed with ink, not real paint, and manufacturers tint them for mass production. Undertone is the other trap. Compare your chip against plain white paper.
Leaning yellow, red, or orange means it is warm. Leaning blue, green, or purple means it is cool. Match that undertone to your existing flors and trim or the color will feel off even if you like it in isolation.
Safe vs. Bold, and When Each Makes Sense
- Small room: a bold, dark color can actually work better than you’d think. It removes the corners visually and makes the space feel intentional instead of cramped.
- Planning to sell soon: stick to safe, warm neutrals. Personality costs you buyers.
- Staying long term: go with what you actually love. You are the one living with it, not a hypothetical buyer.
For the full room by room color system, see How to Choose Paint Colors You Won’t Regret (A Room-by-Room System), and for the deeper walkthrough on testing method, How to Test Paint Colours Before Committing: The Only Method That Works.
Beyond Flat Paint: Texture, Wallpaper, and Panels
Once you have the basics down, there is a whole world of wall treatment ideas beyond a flat wall color. Here is the honest difficulty level for each, because most tutorials only show the polished after photo.
Limewash and Texture
Limewash is genuinely forgiving for a first timer. The mottled, cloudy look is supposed to vary, so an uneven hand actually works in your favor. It is applied with a cross hatch brush motion, overlapping X shaped strokes rather than long straight ones. See How to Apply Limewash Paint: The Honest Beginner’s Guide for the full honest walkthrough.
Want something closer to a plaster look? Limewash vs Venetian Plaster: Which Is Better for DIY? lays out the real difference between limewash and Venetian plaster, and is upfront that plaster takes real trowel skill while limewash does not.
Wallpaper: Traditional vs. Peel-and-Stick
Traditional wallpaper lasts longer and looks more finished, but takes real skill and paste. Peel and stick is faster and beginner friendly, and it is the safer choice if you rent. Best Peel-and-Stick Wallpaper for Renters: 8 Brands Tested and Ranked ranks eight peel and stick brands specifically on how cleanly they come back off.
Wall Panels: Shiplap, Board and Batten, Fluted
Board and batten is the easiest entry point. Simple cuts, forgiving of small measuring mistakes, and still delivers a real textural change. Save shiplap and fluted panels for once you have one wall of experience behind you. DIY Board and Batten Wall: Cost, Materials and Step-by-Step has the full cost and materials breakdown for a DIY board and batten wall.
When Things Go Wrong: What Your Wall Is Actually Telling You
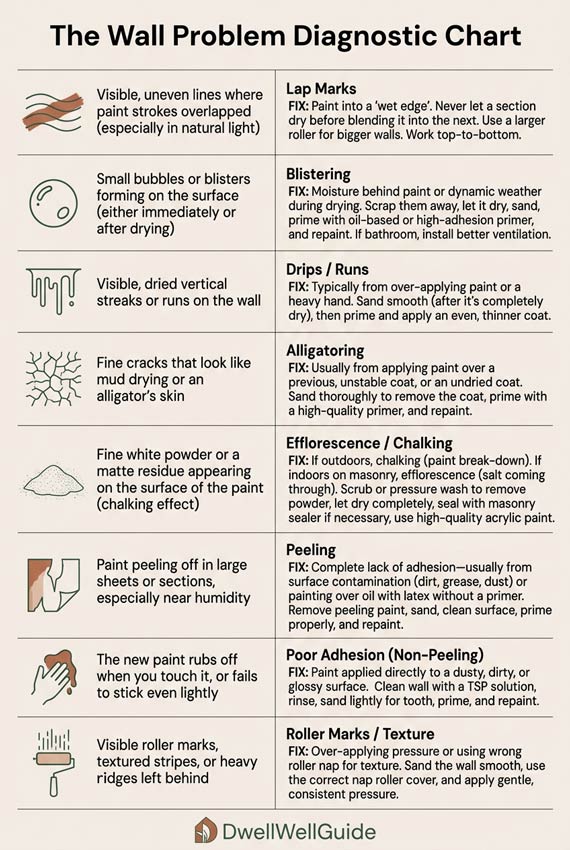
Something looks off on your wall. Before you panic or grab more paint, figure out what you are actually looking at. Paint problems are symptoms, not random bad luck. Match what you see below to the real cause.
| What You See | What It Actually Is | The Fix |
|---|---|---|
| Streaky lines that follow the roller | Lap marks, you lost the wet edge | Work in 2 to 3 foot strips, overlap while still wet, do not stop mid wall |
| A raised bubble or blister | Trapped moisture or heat underneath | Pop it, check what’s under it. Bare surface means moisture is the real problem, not the paint |
| Powdery residue on your hand | Chalking, the old paint is breaking down | Wash thoroughly, apply a binding primer before any new coat |
| A stain bleeding back through | Tannin or water stain, regular paint can’t block it | Use a dedicated stain blocking primer, not more topcoat |
| Paint pulling away with the tape | Tape removed at the wrong time | Remove tape 1 to 2 hours after the final coat, pull at a 45 degree angle |
| Color looks different than the sample | Lighting or undertone mismatch | Retest using the funnel in the color section above |
| Drips or sags running down the wall | Roller or brush overloaded with paint | Wipe excess before applying, catch drips while wet with a dry brush pass |
| Ragged, uneven line along the trim | Rushed or shaky cutting-in technique | Slow down, load less paint, and pull the brush in one continuous stroke rather than short dabs |
One rule sits behind almost every entry on this list. The visible problem is rarely the real cause. Peeling is not a paint problem, it is a prep or moisture problem wearing a paint costume. Diagnose first, then fix.
Tools and Real Budgets
The Actual Tool List
Not a 20 item wishlist. Just what you need, and roughly what it costs:
| Tool | Approx Cost |
|---|---|
| Angled 2.5 inch sash brush | $8 to $14 |
| 9 inch roller frame plus 2 to 3 covers | $10 to $18 |
| Painter’s tape | $6 to $10 |
| Canvas drop cloth | $10 to $20 |
| Paint tray with liners | $6 to $10 |
| Spackle and a putty knife | $8 to $12 |
That is $50 to $85 in reusable tools on top of your paint. Buy once and use for years. See Best Paint Brushes for DIY: We Tested 12 and Here’s the Honest Verdict for the honest verdict after testing 12 different brushes side by side.
TIP: TAKE CARE OF YOUR BRUSHES AND YOU’LL SKIP BUYING NEW ONES
Rinse latex paint out with warm water immediately after use, working the bristles between your fingers until the water runs clear. For oil-based paint, use the appropriate solvent first. A brush cleaned properly right away lasts for years. Left to dry with paint in it, even a good brush is done after one project.
One more thing worth doing before you clean up: save a labeled cup of leftover paint, along with the brand and color code written on the lid, for touch-ups later. A scuffed wall six months from now is a five minute fix if you have the exact match on hand, but a frustrating guessing game at the paint counter if you don’t.
What DIY Actually Saves You
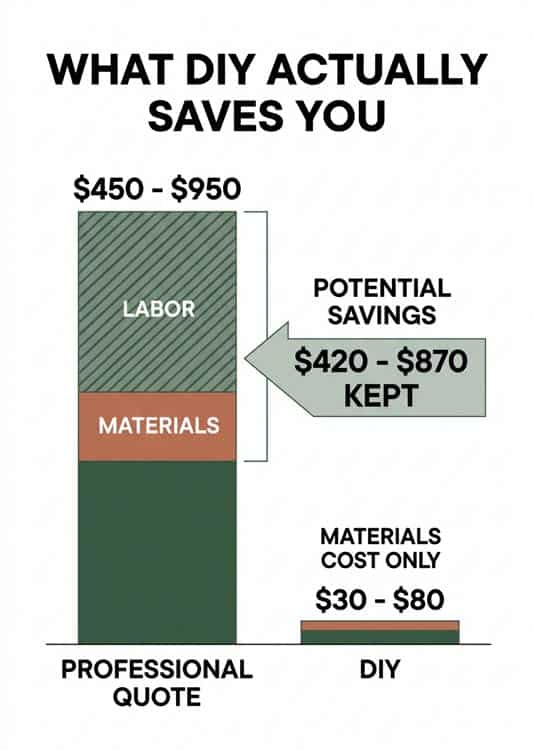
Professional labor makes up 75 to 85 percent of a painting quote. That means materials, the part you are paying for either way, are only 15 to 25 percent of the bill. Here is what that looks like on a real room
| . | Professional | DIY |
|---|---|---|
| Total cost, standard bedroom | $450 to $950 | $30 to $80 |
| What you’re paying for | Labor plus materials | Materials only |
| What you keep by doing it yourself | $400 to $870 |
That gap is the entire case for DIY on a budget and it is not close.
How Long Does This Actually Take?
Everyone underestimates this, including me the first few times. A single coat looks fast in a time-lapse video but it is not fast in real life. Here is an honest breakdown for a standard room.
| Stage | Realistic Time |
|---|---|
| Clear the room and cover furniture and floors | 30 to 45 minutes |
| Fill, sand, and clean the walls | 1 to 2 hours |
| Tape edges and trim | 30 to 45 minutes |
| Prime, if needed, plus dry time | 1 hour plus 2 to 4 hours drying |
| First coat | 2 to 3 hours |
| Dry time between coats | 4 to 6 hours, check your can |
| Second coat | 2 to 3 hours |
| Tape removal and cleanup | 30 minutes |
Add it up: a single room genuinely takes a full weekend when you count drying time, not the 3 or 4 hours a rushed time-lapse suggests. Budget for two days, not one evening, and you will not feel like you are racing the clock.
Frequently Asked Questions
Should I choose paint, wallpaper, or wall panels?
Depends on your situation, not just your taste. Renting or want flexibility? Paint. Wet room? Panels or a moisture rated paint. Want the biggest visual impact and do not mind less flexibility? Wallpaper. See the full wallpaper vs paint guide comparison earlier on this page.
What order should I paint a room in?
Ceiling first, then walls, then trim. Drips fall down, not up, so working top to bottom means you never clean the mess off a section you already finished.
How do I stop regretting my paint color?
Test cheap first, expensive last. Shortlist digitally, order peel and stick samples for your top picks, then paint one large sample patch of your final choice directly on the wall and watch it for 48 hours across different lighting.
What paint finish should I use in a bathroom or kitchen?
Something washable, not flat. Satin or semi-gloss handles grease and moisture far better than matte, which marks easily and cannot be wiped clean without damaging the finish.
Why is my paint job streaky or showing lap marks?
You lost the wet edge. Work in 2 to 3 foot sections and overlap into the still-wet paint rather than letting a section dry before you continue next to it.
Is it cheaper to paint a room myself or hire someone?
DIY almost always wins on cost. A standard bedroom runs $30 to $80 in materials yourself versus $450 to $950 professionally, since labor makes up 75 to 85 percent of a professional quote.
How long do I need to wait before wallpapering a freshly painted wall?
At least 30 days. Fresh paint needs that long to fully cure. Apply adhesive sooner and you risk pulling the paint off the wall when you remove it later.
What’s the biggest mistake people make with wall treatments in general?
Choosing based on a photo without checking if the product suits the room’s real conditions. A gorgeous wallpaper in a dry living room can fail fast in a steamy bathroom, regardless of what the packaging claims.
How long does painting a room actually take?
Budget a full weekend, not an evening. Between prep, drying time between coats, and cleanup, a single room realistically takes 8 to 12 hours spread across two days, even though the hands-on painting itself is only 4 to 6 of those hours.
Do I need to worry about paint fumes or VOCs?
For most modern interior paints, low-VOC and zero-VOC options are widely available and cost roughly the same as standard paint. Ventilate the room while painting and for a day or two after, especially in a bedroom or nursery, and you will be fine either way.
Can I paint over wallpaper instead of removing it?
Sometimes, but it is a compromise, not a shortcut. Paint applied directly over wallpaper without the right primer will not adhere well and can bubble later. If the paper is fully stuck down with no peeling seams, a proper bonding primer first gives you a real chance of success.
How many coats of paint do I actually need?
Two, in almost every case. One coat works only if you are repainting the exact same color over a wall already in good condition. Going darker to lighter, or covering any stain or repair, plan on two coats minimum, sometimes three if the color change is dramatic.
How do I match paint for a touch-up later?
Save a labeled sample of your leftover paint with the brand and exact color code written down. Without that, most paint stores can color-match a small chip you bring in, but it is rarely a perfect match since factors like the wall’s age and sun exposure change the color slightly over time.
Paint Once. Get It Right.
Every painting and wall treatments decision on this page comes down to the same idea: slow down at the start, and the rest goes faster. Pick the right material, test your color properly, prep before you paint, and you will not be standing in front of a streaky wall at 11pm wondering what went wrong.
The projects on this site are written the same way this guide was: tested, not guessed at, and honest about what actually goes wrong so you don’t have to find out the hard way.
If you want to go deeper on a specific project, these are good next stops.
- Budget Home Renovation Guide, the full master pillar for this site
- How to Paint a Room Like a Professional: The Complete Step-by-Step Guide, the complete step-by-step for painting a room start to finish
- Limewash vs Venetian Plaster: Which Is Better for DIY?, if limewash has you curious about Venetian plaster too
